
Building a Chat-AI to answer about your own data — Part I
First things first


First things first
Addressing the elephant in the room: no, we will not build a version of ChatGPT here, nor will we follow anything related to how it was trained.
But we will use Large Language Models (LLMs), which is the family of models that ChatGPT is based on, still not in a generative way but to learn representations of text. Ultimately this guide aims to build a simple question-answering interface, that answers only using the prior information you have provided.
This can also be viewed as a basic semantic search engine with a chat interface.
Why do this? What are the use cases?
While an all-embracing, generalized, know-it-all answering machine is impressive, in reality, there is more value in an expert agent that allows more control over the generated outputs and a lesser probability to make mistakes.
Such an agent can help us retrieve meaningful information from large corpora with the ease of a natural conversation, which is otherwise quite cumbersome to handle. The use cases from the top of my head are;
get answers from a software documentation
get answers on legal matters from a large collection of legal documents
get healthcare information but only from a collection of trusted sources
…
You get the idea. Let’s dive in.
Demo
This is the goal.

Core Concept
The way we are utilizing LLMs in this app is to generate embeddings of text. An embedding is a numerical representation of a text segment that can be either several words, a single word, or even a single character. This is something to evaluate and decide depending on your application.
In this basic version of the demo app, we perform sentence embeddings where a sentence is a question that is asked by the user.
Also in advance, we generate embeddings for the questions that we have in our data store. So upon a user query, how an answer is chosen is by looking at the similarity between the ‘user question embedding’ and a ‘stored question embedding’.

A bit about this approach
One of the most discussed drawbacks of ML in general is the difficulty to control the outputs from a model. But in the above approach, an LLM is only used to understand language and to select which answer is the most relevant. Since the answers are predetermined, we have more control over the ultimate output to the user in this setup.
Of course, this approach will not match all use cases. But in applications where a ‘generative’ output is too risky, I argue that this is a good workaround.
System Overview
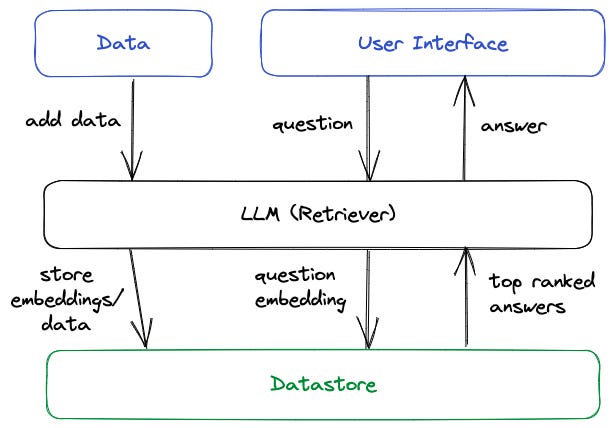
The main components of the system and the utilized tools are as follows;
LLM (Retriever) — The LLM used in this version is a sentence-transformer from HuggingFace. This is the most crucial component of this app and I use a tool called haystack to build it.
Haystack makes it easier to work with transformer models and it has pre-built functionality for question-answering capabilities, so we don’t have to build everything from scratch.Data store — I use Elasticsearch
Elasticsearch is a database that stores documents in an unstructured manner and is optimized for search functionalities. I chose this with scaling in mind.User interface — Streamlit
Streamlit is a python tool that lets you build quick web applications. Highly recommended.
The steps
Download the nanoQA GitHub repo
git clone https://github.com/miranthajayatilake/nanoQA.git
cd nanoQA
Next, we have to set up the python environment. The best thing is to create a new virtual environment for this project with python3. I personally use Anaconda to manage python environments. Once you have it, install the required dependencies.
pip install -r requirements.txtThe data store setup
Let’s set up elasticsearch locally to be used as the data store in this project. I prefer using Docker for this because it is easy to use. Make sure you have Docker running on your machine.
Run the bash script that will pull the elasticsearch image and run it on the relevant ports.
bash datastore.shSample data and indexing
The next step is to obtain your data source, restructure it and store it in a meaningful way so that it fits a question-and-answer format. Let’s dive into what this means.
In the demo app, we use a sample dataset (a CSV file) that has some FAQ data on COVID-19. Since this already has a structured set of questions and answers along with some more meta-data, there is no need of restructuring it. The script sample_data.py takes care of downloading and indexing data. The arguments are: sample_data.py path_to_save_data download_location elasticsearch_index_name
python sample_data.py data/faq_covid https://s3.eu-central-1.amazonaws.com/deepset.ai-farm-qa/datasets/documents/small_faq_covid.csv.zip index_qaThe index name can be replaced with anything you desire. Also, please go through the script to see how the question embedding is performed and stored along with the data. I hope to make this process more customizable in future releases of the repo.
The UI
Now that we have all the backend components set up, what’s left is to spin up the sample user interface. You can easily do this with the below command.
streamlit run app.pyThe script responsible for the UI isapp.py . The main components are all built on top of haystack . And the LLM we are using in this demo is calledsentence-transformers/all-MiniLM-L6-v2 . This is pulled from HuggingFace — model page.
More control over outputs
I perform a custom filtration of the results to make it more fun. One of the outputs from the similarity calculation step is a similarity score between 0 and 1 (1 meaning identical).
I set a minimum threshold of 0.7 for an answer to be eligible. If the maximum similarity score among the outputs is less than 0.7, I overwrite the output to the user saying that nanoQA could not find an answer. This prevents the app from giving irrelevant answers.
if prediction['answers'][0].score >= 0.7:
   ...print answer...
else:
   st.write('nanoQA failed to find an answer with confidence...sorry!')
Providing evidence for the answer
Another addition to the demo app is printing the source of the answer and the link. This is possible because, in our sample data, we had metadata on these sources and links.
I believe this is a powerful feature for an application such as this in terms of user experience.
That’s it for this one.
I hope you gained useful knowledge from this project. I plan to keep improving this application and write successive posts on more exciting features. So make sure to follow my blog and the nanoQA GitHub repo 🔥.
I also started a newsletter where I interview founders and AI engineers who are building impactful AI applications. Check it out 🫶
Paradigm | Mirantha Jayathilaka, PhD | Substack
Stories of companies and individuals building impactful AI applications and sometimes even complete businesses with AI…paradigmai.substack.com
We also have interesting chats over at our Discord. Join in 🤝🏽
Join the ParadigmAI Discord Server!
Check out the ParadigmAI community on Discord discord.gg
Thanks for reading!